Click here to download the SQL Server PowerBI Template -
OctopusDeploySQLServer.pbt (https://bit.ly/2C9iuvf)
Once you have downloaded the OctopusDeploySQLServer template, open it up.
You will see PowerBI attempt to refresh the data, you will see the pop-up below, click 'cancel'. |
|
Now from the 'Home' bar, click 'Transform data' and select 'Data source settings'. |
|
Click on 'Change Source...'. | ![](https://blogger.googleusercontent.com/img/b/R29vZ2xl/AVvXsEgw7kBky5mT7LRnU3oE5FvhYuO84bkguLUDWUBjetjgJSIXVnk169gj6e8c37xXvG80Ih0UgE2T22JTubhHvOoYNhD96ELFZyQ5o6Xi6CaeusOSKq-YdV3pDFyI1WGJVKESN17NgZGWGCM/s200/datasourcechange02.png) |
Enter in your local SQL Server name and instance if needed, and enter your database name, then click 'Ok'. | ![](https://blogger.googleusercontent.com/img/b/R29vZ2xl/AVvXsEgqE135B2kRhIFRZUyHjdJtVAzX_GzP7peqTKpyYeGnN8tmuVgJXgh1pg8Zc2YBcu8IjbCtLGvC8-fFID1LL40ubVgA8KH3wL6ZnzTK5LglXsd5DeeC_1BBuFykxR7OyvSGGWFPljEoIWo/s200/datasourcechange03.png) |
Now you should see your server and database listed, next click on 'Edit Permissions...'. | ![](https://blogger.googleusercontent.com/img/b/R29vZ2xl/AVvXsEjn5v_iOeFECsp7ShsIOptuzygfGKONLZ0jF6k6etkbEtmNoQ_oJwYwJUaE4C4hb8GCW4tIZcvbDRNDPMN2mseT54IlHm8Z639ONqVAZAEiArpCvzYbhAUc6ngTr3T9jGFwVHzU8i4auVc/s200/datasourcechange04.png) |
Now under Credentials, click 'Edit...'. If you notice the current type is 'Database'. | ![](https://blogger.googleusercontent.com/img/b/R29vZ2xl/AVvXsEgTS7feLVzikhDrCWLaUgJlru9kSXn7OBDJVKN8I3lIrPh5GpMX8Ky49DPAS5vhW0SKkL1yqdYh-35dAjzNwjKY0X5-2Qir9aq5n9-vMY1w-vvpMpNkL8SojsVe6CeZw_bKypaRbDCgLQ0/s200/datasourcechange05.png) |
If you are going to connect using SQL Server database user account, select 'database' then enter your username and password and click 'Save'. | ![](https://blogger.googleusercontent.com/img/b/R29vZ2xl/AVvXsEgA6pCm3orWQTmdfjjJ6vw3jkPEb86W6fh-lRGQh8uBhyphenhypheneoqIsVftGqOKt9909rc7USHExGR47E_pE0aMMDaPTNHm6VD771I0hRgyLAttWDZeu723QUcl7Vp-OpV4_-WjX5TD4tNUGOkUo/s200/datasourcechange6.png) |
If you use Windows Authentication, select 'Windows' and select either 'Use my current credentials' or enter 'alternate credentials' and click 'Save'. | ![](https://blogger.googleusercontent.com/img/b/R29vZ2xl/AVvXsEjG5lwL6lv4vF0TPk57QaMGunScUpNEoToE9rUAGlfKIMEkiZFlZ1QqxieHTElaBhYfqJHC6qZZ1eLq0D_6ERRKovbBrZhDABDcuihMJw4r5HOEVkxDtxG4TLOzgsuWaWoLV69OUBCLRqQ/s200/datasourcechange7.png) |
If your instance uses a Microsoft account, then select that option and click 'Sign In' and follow the prompts and then hit save. | ![](https://blogger.googleusercontent.com/img/b/R29vZ2xl/AVvXsEi3hu-BI7BRsKZXMCAkj0DCOAjasvnq8PC1cnOpuol2aaL4_J9Y6m4GRvqVP9d4Lbg6zbXT3zO3501YVdvD4t2yH-tdVWE7bKy5Hsxaoo5DB1K0Dyza8rEuEH4gWff5xQlzTO2ak747Ka4/s200/datasourcechange8.png) |
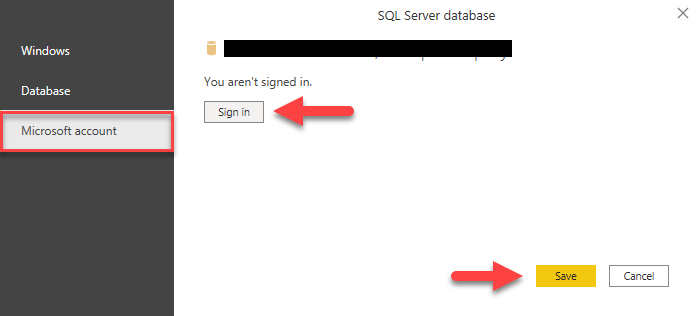
Once you save your credentials, click 'Ok', then on the 'Home' bar, click 'Refresh' to connect to your database and refresh your data. |
|
Comments
Post a Comment